XState - a Typescript state machine with a lot of features
This post was sparked by a tweet from Ryan Florence…
It has been quite some time ago since I last looked at defining a state machine with a DSL in C# and then execute it, so I got curious and visited xstate.
What you get access to is a library that gives you the ability to declare a state machine with a lot of features. I wanted to recreate the “tape player” from my post 12 years ago. Considering that xstate brings a lot more to the plate, I wanted the tape player to be more feature complete than just being able to play and stop. The source code for the final result runs as a react app and can be found here.
At statecharts.github.io it is possible to visualize the state machine that you defined. For the tape player in the source code we get this:
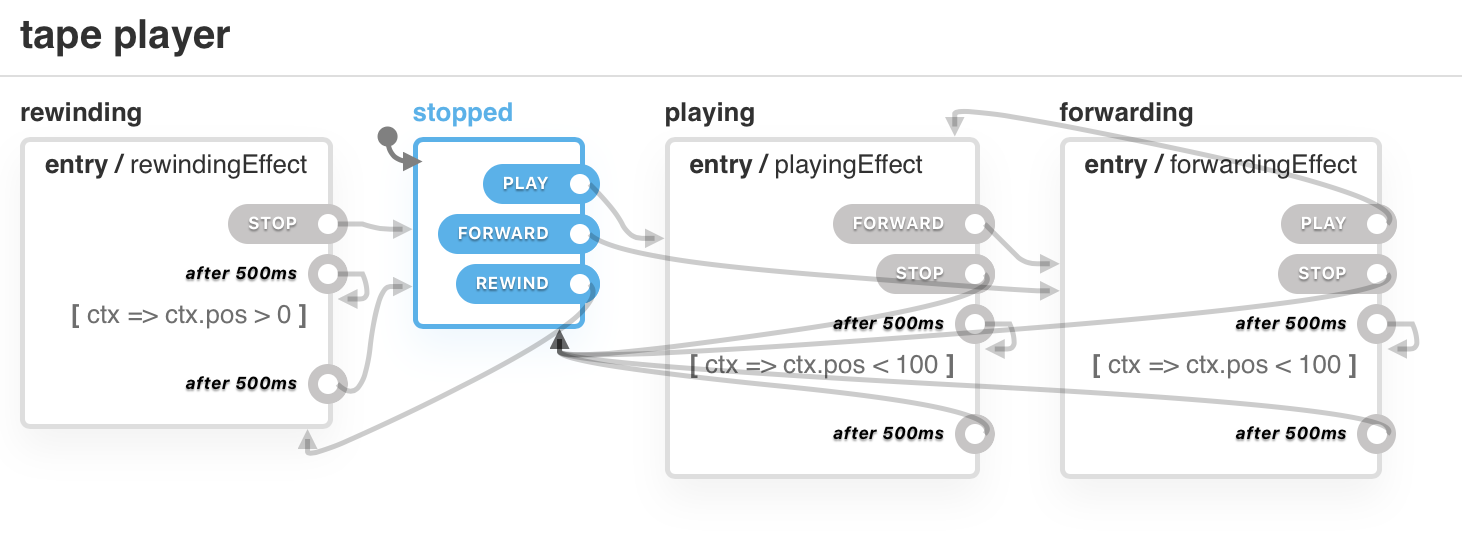
Unfortunately you can’t move the boxes. What you see is the states (the big boxes) and events (the small labels that start arrows) that define your state machine.
The tape player is initially stopped. The PLAY event moves it to playing. Basically you can move from playing to forwarding and back to playing, but if you want to be rewinding, you need to be stopped first.
You perform transitions by raising events. These events can be typed:
export type EventId = "PLAY" | "STOP" | "FORWARD" | "REWIND";export interface TapePlayerEvent extends EventObject { type: EventId;}Then you can define your available states:
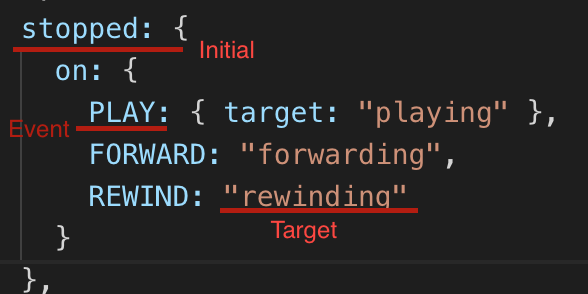
export interface TapePlayerStateSchema {  states: {    stopped: {};    playing: {};    forwarding: {};    rewinding: {};  };}
export type AvailableStates = keyof TapePlayerStateSchema["states"];
The state machine also allows to define a context. Here we will use it to track the tape position:
export interface TapePlayerContext { pos: number;}These three types give you a little bit of compile-time safety once you start defining the main configuration object for your state machine:
function machineBuilder(): [ MachineConfig<TapePlayerContext, TapePlayerStateSchema, TapePlayerEvent>, any] { return [ { id: "tape player", initial: "stopped", context: { pos: 0 }, states: { rewinding: { onEntry: ["rewindingEffect"], after: { 500: [ { target: "rewinding", cond: ctx => ctx.pos > 0 }, { target: "stopped" } ] }, on: { STOP: "stopped" } }, stopped: { on: { PLAY: { target: "playing" }, FORWARD: "forwarding", REWIND: "rewinding" } }, playing: { onEntry: ["playingEffect"], after: { 500: [ { target: "playing", cond: ctx => ctx.pos < 100 }, { target: "stopped" } ] }, on: { FORWARD: "forwarding", STOP: "stopped" } }, forwarding: { onEntry: ["forwardingEffect"], after: { 500: [ { target: "forwarding", cond: ctx => ctx.pos < 100 }, { target: "stopped" } ] }, on: { PLAY: "playing", STOP: "stopped" } } } }, { actions: { playingEffect, forwardingEffect, rewindingEffect } } ];}At the top you will find definitions for the initial state and the initial context.
The states property then defines all states and to which state you will transition given an event.
Then you can use an “onEntry” hook to specify an effect to occur when the state is entered. This is essentially a call into a function. The effects that I have defined change the pos-field of the context.
const playingEffect = actions.assign<TapePlayerContext, TapePlayerEvent>(  ctx => ({    pos: ctx.pos + 1  }));
const forwardingEffect = actions.assign<TapePlayerContext, TapePlayerEvent>(  ctx => ({    pos: ctx.pos + (10 - ctx.pos % 10)  }));
const rewindingEffect = actions.assign<TapePlayerContext, TapePlayerEvent>(  ctx => ({    pos: ctx.pos - (ctx.pos % 10 || 10)  }));
They move the position slower or faster, depending on when those effects will take place.
The final piece of the puzzle is the possibility to specify state transitions after a specified amount of time.
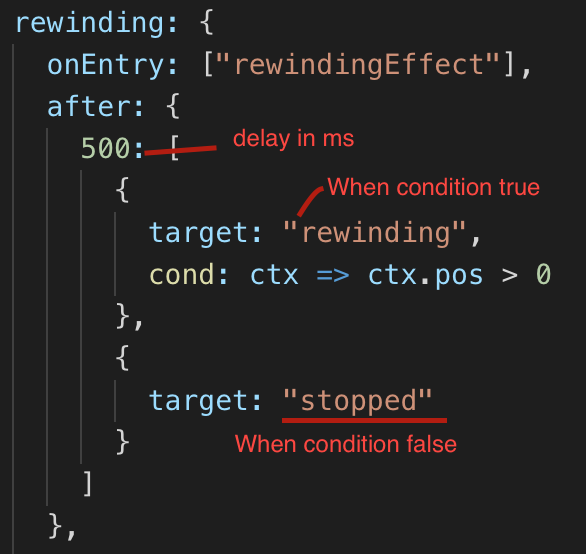
Here, the rewinding state transitions to itself after 500 milliseconds. If the specified condition is true, it will stay in the rewinding state, otherwise it will move to the stopped state. The effect specified in onEntry will be called everytime the state is entered.
For some fun, we can then hook the machine to some visuals…
First, you need to create the state machine and then run it through an interpreter:
createStateMachine = () => { const [states, options] = machineBuilder(); const machine = Machine<TapePlayerContext, any, TapePlayerEvent>( states, options ); const service = interpret(machine).onTransition(state => { this.setState({ tapePosition: state.context.pos, currentState: state.value, nextPossibleStates: state.nextEvents }); }); return service; };of interest is all the info that we get during a transition of the state machine. We will get
- the current tape position
- the current state
- and the list of possible next states given the current one.
All this is put into the state of the component.
Finally, on componentDidMount, we start() the interpreted machine (returned as service to an instance field of the component within the component’s constructor).
I define two methods that help us check on the current state from within render()
mayNotSend = (event: EventId) =>  this.state.nextPossibleStates    .findIndex(v => v === event) == -1;
isCurrentState = (state: AvailableStates) =>  state === this.state.currentState;
Which can be used as such e.g. on the rewind button:
<Spool role="backward" disabled={this.mayNotSend("REWIND")} active={this.isCurrentState("rewinding")} onClick={this.rewindClick}/>And as a final example, the rewind click:
rewindClick = () => { this.stateMachine.send({ type: "REWIND" });};This is how you send events to the state machine.
As you can see, xstate was up for the task and I can tell you that I barely scratched the surface of what you can represent with the library. The UI is fully driven by the state machine and the events that you can raise with the buttons. Smooth!
Don’t forget, the full example is available here on the basis of create-react-app. Enjoy your states!